


 I have been witness only once to the failure of rigging equipment when a colleague was removing a large London Plane tree about 8 years ago. London Plane is very dense and heavy wood. The tree had been pollarded multiple times over the years at the same point. When it came to rigging this piece out, he continued to tie up the chuck in a conventional negative rigging system around the whole of the pollard point. If a quick calculation had been done we would have known that once rigging off, the force this piece would generate would by far exceed some of the rigging component’s breaking strength. The inevitable happened and the rigging line snapped at the point where the knot had been tied. Luckily none of the crew where injured but a retaining wall and part of the driveway were damaged and this was a luxury property in St. Johns wood, London..
As Climbing Arborists we should constantly be looking for new ideas, techniques and equipment to use in order to overcome different tasks that we may be face in the future. This industry seems to be evolving everyday so we should always be trying to stay at the top of our game.
 A few months ago I was shown the rigging technique ‘Double Block Rigging’ by Gareth Tudor-Jones of Bartlett Tree Experts. Gareth did some field-testing with this rigging technique using load cells to demonstrate its advantage and get real life readings and results.
The double block rigging technique is a great technique for rigging large/heavy pieces as it helps to spread the force of the piece(s) being rigged. It uses more rope in the system to help absorb energy, using more components to help spread the load and reduce the shock load on the stem its self.
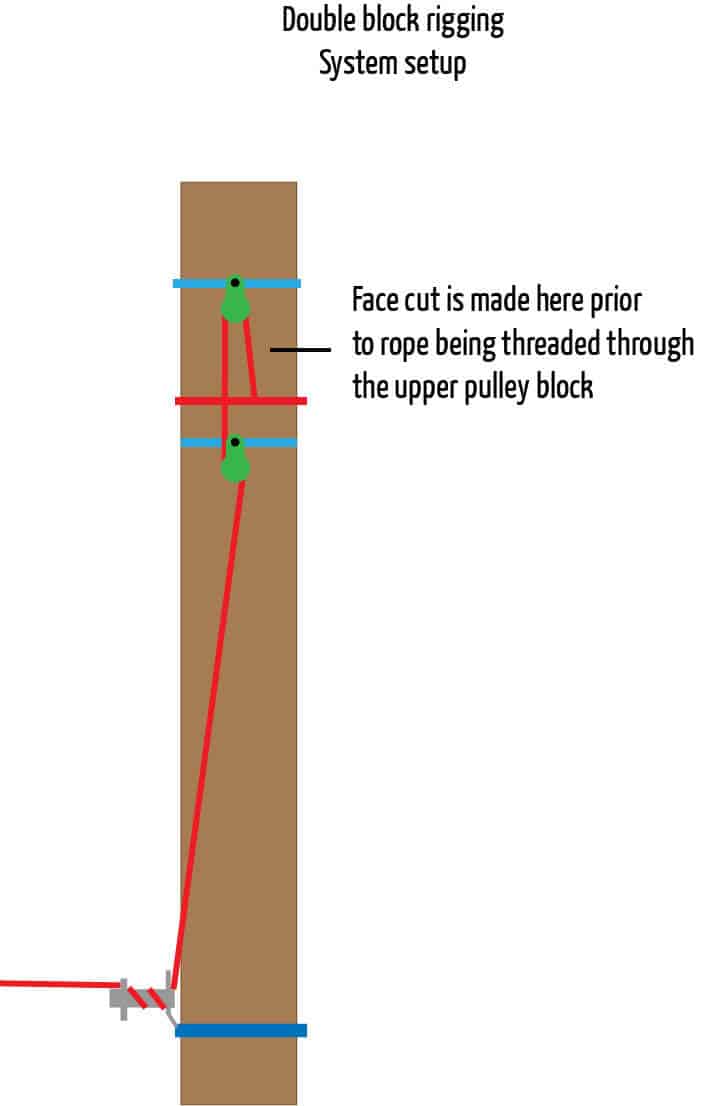
 How it works
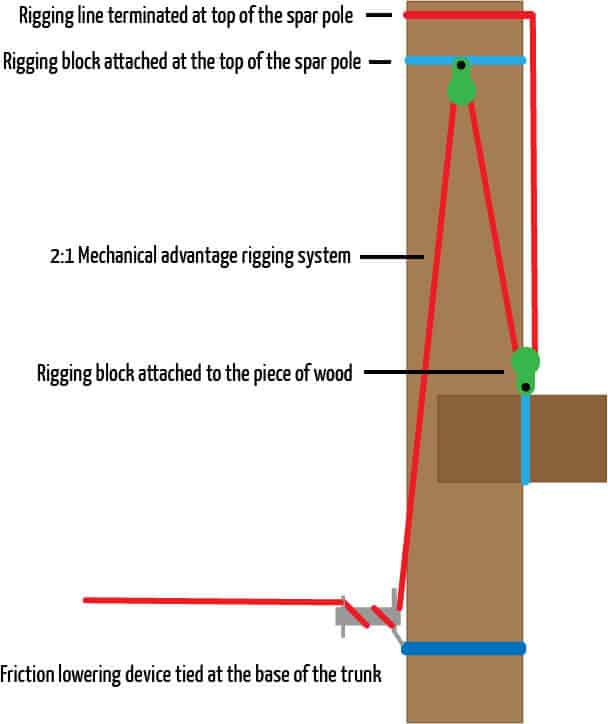
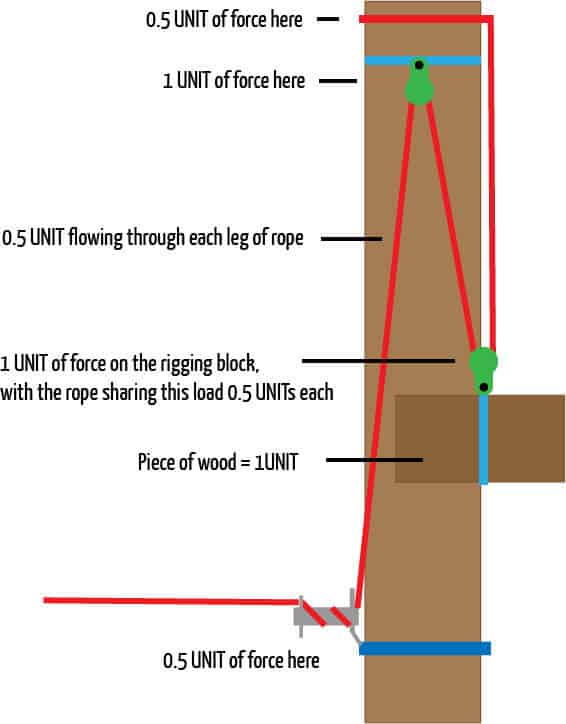
Looking at the illustration the first thing to note is that the rigging system has created a 2:1 mechanical advantage, this part of the system is where we get the greatest reduction in forces and load, as opposed to the conventional rigging system that actually multiplies the load at the block. In addition to the M/A this system requires 1/3 more rope, which equates to the rope absorbing force over a longer length of rope.
Looking at the system we can see three separate points of attachment, the termination of the rigging line, rigging block on the section of wood and the block on the top of the stem. Using a system with two pulley blocks like this one means that the load is spread between them, these are hugely important factors when thinking about the life span of your rigging components.
Below is a video that demonstrates how to set up and execute this system.
To the right is an illustration including the field data gathered from Gareth Tudor-Jones (of Bartlett tree experts) to show how this system works in the real world.
One of the considerations Gareth needed to solve was to determine where the best termination end location was for DBR. Gareth decided to test various levels.
Level 1 - top of the spar pole
Level 2 - level with base of the rigging block
Level 3 - about 1 foot below the rigging block
However, this system is specialist and not the type of setup you would use on an everyday basis. There are some fairly obvious downsides to using the DBR system, to start with it is more time intensive to setup especially the first few times you use this system. Secondly you need more equipment for this setup, extra rigging block, additional rigging sling/strop and possibly a longer rigging line etc. You should select heavy duty rigging blocks if piecing down a stem, they would need smooth side plates as not to cause damage to the rope as the rigging blocks may twist.
To sum up, this is a system primarily for rigging large sections using a method designed to reduce excessive loading across your rigging components. It is a technique that due to the time disadvantage will require a specific job but is another great tool to add to your toolbox and helps open the mind a little more about they way we can configure our equipment to get different results. The next time you do a removal it would be worth giving this technique a try to familiarize yourself with it before executing it on larger pieces. Climb safe… Work safe…
